Choosing the Right Rivet for your Airstream Repair
Feb 11, 2024
What types of rivets are installed on an Airstream?
- Solid Rivets (Buck Rivets) - Both Soft and Hardened, this rivet type is used on the exterior shell – ends, sides and roof.
- Blind Rivets (Open and Closed End) – Used for attaching exterior trims, underbelly, wall structure and interior skin.
- Bulb Type Rivets (Olympic Rivet) – Used to attach awning brackets, slide out trim, replacement of buck rivets as a repair, and often used during a service repair.
 Solid Rivets (Brazier Head Buck Rivets) – Solid and strong, this rivet type requires access to both sides of the rivet for installation. In most cases, this requires 2 people for the installation process.
- This is the original rivet type used on the Airstream exterior.
- Brazier or modified brazier rivets have an oval shaped head.
- Brazier head are anodized to prevent them from oxidizing.
“A” type solid rivets are “soft”. They are fabricated from 1100-grade aluminum and have a tensile strength (resistance of breaking under tension) of 38,000 PSI. See Airstream 5/32” x ½” / .312 Head Diameter x .051 Head Height Solid Aluminum Rivet – 325102
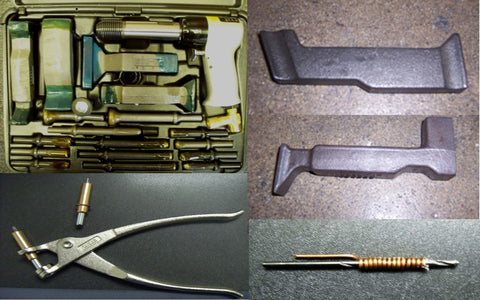
Required Tools for Solid Rivet Installation
-
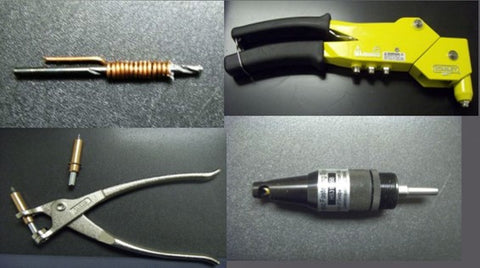
Rivet Gun – 3X or 4X with Rivet Set
- Rivet Guns range from 1X to 4X
- 1X has a shorter barrel and more strokes per minute / 3600
- 4X has a longer barrel and less strokes per minute / 1600 (more power)
- Pressure Regulator
- Air Compressor
-
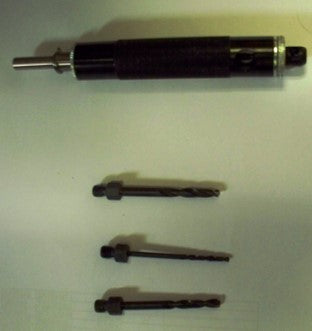
Drill with Number 30 (1/8”) Bit
- Wrap drill bit with copper wire to set depth of drill bit
- Bucking Bar – “T” type or Straight – will depend on application
- Clecos – or some type of clamp to hold material in place
-
Rivets
- Size and type will vary based on where it is used
What’s Next?
- Make sure the aluminum is tightly together
- Protect the area all around and adjoining where you will be drilling the hole(s)
- Drill hole(s) with a drill bit no larger than 1/32” of the rivet diameter
- Hold the drill straight when drilling
- Be cautious and careful that metal shavings don’t scratch the area where drilling
- Remove “burrs” so rivet head remains tight against the aluminum when riveted
- Make sure rivet gun is properly adjusted with correct rivet set for head
- Insert correct size rivet – the rivet should protrude through the aluminum 1.5 times diameter of the rivet
- Place rivet set on rivet head
- Have the person (“bucker”) hold the buck bar against the back side of the rivet – don’t push, let the bucking bar to the work.
- Rivet gun operator hits the rivet
- Shop tail (when bucked) should be 1.5 times the diameter of the rivet
Bulb Type Rivets (Olympic Rivets) – three legged with heads that look like solid buck rivets, when shaved properly. These rivets can be installed without removing interior panels.
This rivet type is often used as a replacement for buck rivets when it is not feasible or desired to dismantle the trailer interior to access the back side of the panels being riveted. Strong enough for most repair projects, but not quite as strong as the buck rivet. 
- How the Bulb-Tite Type Rivet (Olympic Rivet) Works: During installation, the rivet body folds into three separate legs and the mandrel breaks off above the rivet head.
- Weather Tight: This “crown crimp” effectively seals the rivet bore off from intrusion of dirt and moisture. The plastisol washer seal (optional on some bulb-type rivets) prevents moisture from intruding beneath the rivet head.
- High Strength: Another benefit of the bulb-tite rivet’s retained mandrel core is the added strength as it provides high clamp load.
- Finished Appearance: The unique shaveable head bulb-tite rivet was specifically designed for use in heavy truck and trailer applications where solid rivets are used. They are ideal for repair of solid riveted assemblies where access to the application’s blind side is no longer accessible. The shaveable bub-tite rivet head is finished using a special head shaving tool. Shaved bulb-tite (Olympic) rivet heads offer the appearance of solid rivets in the installation assembly.
Required Tools for Olympic (Bulb-Tite) Rivet Installation
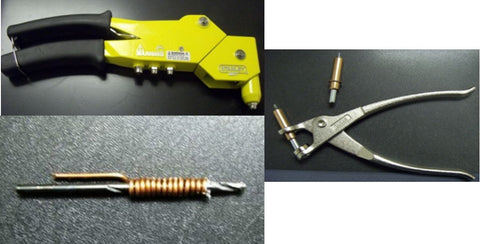
- Manual or Air Rivet Gun
- Drill with No. 20 Drill Bit
- Clecos or Clamps for securing metal
- Olympic (Bulb-Tite) Rivets
- Side Cutter
- Rivet Shaver
Blind Rivets – used where the rivet is not accessible from both sides and can be installed without removing panels. This rivet type has an integral mandrel that permits the formation of an upset on the blind end of the rivet.
- As the mandrel is pulled into or against the body being riveted, it breaks at or near the intersection of the mandrel shank and its’ upset end.
- Blind rivets are often called POP® rivets. POP® is a registered trademark of Emhart Teknologies. However, they are not the only source for blind rivets.
- There are open end (left) and closed end blind (right) rivets.

Required Tools for Blind Rivet Installation
- Hand rivet or Air Rivet Gun with correct nose piece
- Clecos or clamp for securing metal
- Drill and proper drill bit for type and size of rivet
Choosing the Correct Rivet for the Application
- Joint Strength - Determine the single-joint tensile (maximum load resistance breaking under pressure) and shear values required for the application. These are functions of total joint strength, fastener spacing, rivet body material and rivet diameter. Then refer to the “shear” and “tensile” columns on the product, and select a rivet that provides the values required. POP® brand rivets are not certified for structural aerospace applications.
- Joint Thickness – Measure the total thickness of the materials to be joined. This determines the required “grip” of the rivet you select. Refer to the “Grip Range” column and select a rivet with the grip range that includes the work thickness required. Remember that insufficient rivet length will not allow proper formation of the secondary head at the back of the work.
- Nature of Materials – Both the rivet and the materials to be fastened will affect the ultimate joint strength. As a general rule, the rivet materials should have the same physical and mechanical properties as the materials to be fastened.
- Hole Size – Hole size can be important in blind riveting. Too small of a hole will make rivet insertion difficult. Too large of a hole will reduce the shear and tensile strength and may even cause bulging or separation of the members by allowing the rivet to expand between them instead of on the blind side. Best practice is to follow the hole.